Easiest Way to Solve a Rubik's Cube
"If you are curious, you'll find the
puzzles around you. If you are
determined, you will solve them."
(E. Rubik)
Easy way to solve the Rubik's Cube
The Rubik's cube is a mechanical 3D puzzle, invented by the Hungarian E. Rubik, more than 40 years ago and this puzzle is the best selling toy at all times!
There are many approaches on how to solve the Rubik’s Cube. Usually people can solve one face of the cube intuitively, after that they need some help.
In the following article I show you how can you solve the cube with the beginner’s method the easiest way. The method presented here uses just 4-6 easy to memorise algorithms.
The Rubik's cube is actually a 26 pieces puzzle. The pieces or cubies (the smaller cubes
that make up the Rubik's Cube):
Corner piece :
each carries three different colors (there are 8 corner pieces
in the cube)
Edge piece :
each carries two different colors (there are 12 edge pieces in
the cube)
Center piece :
each carries one color (6 center pieces, all are located on
the core)

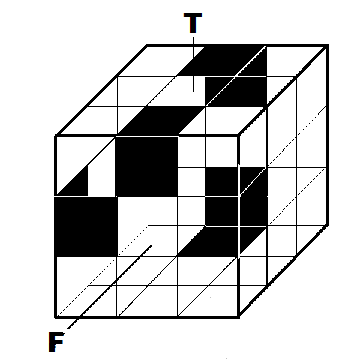
Rubik's Cube move notation (modified)
When describing the solution we'll use our notations. These are a little different from
the international notations (D. Singmaster, D. Wolstenholme). The Rubik's cube notation
helps to convey a sequence of moves through writing.
A sequence of moves is called an algorithm.
Every face given a letter (consonant):
F (Front):the front face
B (Back):the face opposite to the front face
R (Right):the right face
L (Left):the left face
T (Top):the top face
D (Down):the face opposite to the top face
and
M (Middle): the layer between L and R faces, turn direction as L.

Every turn given a letter (vowel):
E or I letter (high vowels) means turning that face 90°, 1/4 or single turn clockwise. This move can be considered a basic turn, therefore this notation can be omitted. (It can also be used the "IE" or "EI" - when it is unambiguous - cannot be understood wrongly).
A or O letter (low vowels) means turning that face 90°,1/4 or single turn counter-clockwise. (It can also be used the "AO" or "OA" - when it is unambiguous.)
U letter means turning that face 180°, 1/2 or double turn - either way. The shape of the letter remind us the move. (Logical, instead of the "U" letter it can be used on the next double vowel: OO, EE, AA, II.)
Possibilities for vowel variation will serve the purpose of making the algorithms different form (although equal value) can be written, so these algorithms (sequences of moves) much easier to remember and memorize for novices.
The official color scheme of the Rubik’s Cube is the next one: white is opposite of yellow,
red is opposite of orange, and blue is opposite of green.
These color scheme is called BOY (because the Blue, Orange and
Yellow faces go clockwise around a corner).
The grey cubies are not important at the stages, and you can just ignore them.
Do you know that a 3x3x3 Rubik’s cube has about 4.3 quintillion possible ways of being scrambled up? Of course, only 1 of the 4.3 quintillion is the solved Rubik’s cube. Solving the cube considered an almost unreal task? Not at all! Just follow this very simple step by step (piece by piece) solving guide.
Therefore the solution is divided into steps each of which solves number of pieces without destroying the ones of previous levels. When you know a few easy to memorise algorithms, it is very simple to solve. The method described in this article is the layer method: we first solve one face of the cube (first layer), then the middle layer, and finally the last (third) layer.
1. Solving the first layer
Choose one face to start with. Always start with the same face, it's easier and it allows you to save time if you solve it several times. In the examples that will follow, the color for the first layer is yellow (the yellow or white pieces are easy to locate). Completing the yellow face is not enough, you have to complete the first layer.
The first layer is solved in two stages (solving the edge pieces and the corner pieces
of the top layer):
Solve the cross. Set into position the four edge pieces that contain
yellow. You should be able to do this by yourself without learning algorithms.
Solve the four corners of the first layer, one by one. (You should also be able
to place the corners without learning algorithms.)


This step is solved logically without the use of algorithms. I believe that the first layer should be done intuitively. Your cube should now look like this. You have now solved 1/3rd of the cube!
Here are some tips for inserting the top layer corners:
When working with a first layer corner piece that is in the first layer (but in the wrong
corner position), you will need to get it out of the first layer into the last layer, then
insert it into the correct first layer corner position.
The same principle applies if a first layer corner piece is in the correct first layer
corner position but needs to be flipped around. You need to get it out of the first layer
(ie. into the last layer), and then re-insert it into the first layer the correct way around.
Before you start the next step, flip the cube over so the face that is complete is now the bottom, so you can see what you're doing.

2. Solving the middle (second) layer
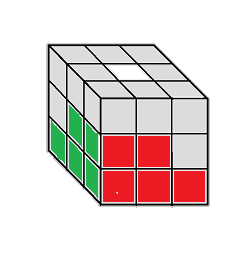
The next thing you need to do is solve edge pieces in the middle layer. Notice that the middle layer consists of just four edge pieces that need to be solved.
An easy way to identify a middle layer edge is to look for edge pieces that have no white stickers on it. For example you are looking at the red/blue or red/green edge piece. Now look at the sticker on that piece that is on the top row, not top of cube. For example the red sticker is on the top face. Rotate the top layer of the cube until the red sticker will be the farthest possible to the red center. See image!

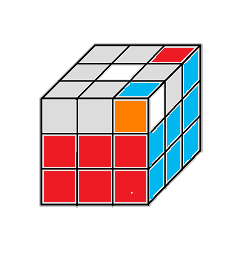
There are a couple of situations that can happen, so do whichever applies:
1. The other face of the edge is green then remove to on the left side (A). Do this algorithm: FeTaFa-TaLa-TeLe
2. The other face of the edge is blue then remove to on the right side (B). Do this algorithm: FaTeFe-TeRe-TaRa

FeTaFa-TaLa-TeLe FaTeFe-TeRe-TaRa
In a case that an edge piece is in its correct location but not oriented correctly, insert a wrong edge piece to this location, and as a result the wanted edge piece would go back to the top layer.
Observe that what you are doing each time you solve a middle layer edge. First to form a pair the edge and the corner piece of the first layer (1-3 step) and an easy rotate you turn the paired pieces in the first layer (4-7 step). Fully transparent process, therefore, not have to memorize the algorithms.
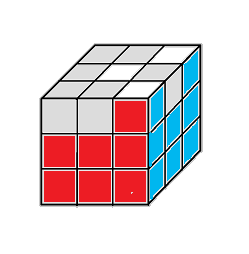
Repeat until entire middle layer is solved. Your cube should now look like this. You have now solved 2/3rds of the cube!


3. Solving the last (third) layer
The last layer is solved in four stages:
1. Permuting corner pieces
2. Orienting corner pieces
3. Permuting edge pieces
4. Orienting edge pieces
3.1 Permuting corner pieces
At this stage, our goal is to place the corners of the last layer in their correct position, regardless of their orientation.
In this step there are only two different states:
1. Two neighboring corners are correctly placed. Hold the cube with these corners on the right to do the algorithm.
2. The opposite corners are correctly placed. You will have to do the algorithm twice, the first time with any face forward. Then put the good corners on the right and repeat the move.
There are always two corners that can be placed correctly but they can be hard to find. Check the corners: if you don't find two in the right place, turn the top layer a quarter turn and check again. Keep looking until you find them!
Hold the cube with the yellow side on the bottom, and the two corners to be swapped are in the front right top and the back right top positions. See image!
Perform the following algorithm: La-Te-Re-Ta - Le-Te-Ra-Tu.
Suggestion is for the memorization: Later tale(n)t era, too.
End of this stage we now have the corner pieces in their correct positions, but not necessarily correctly orientated.
3.2 Orienting corner pieces
Now that the corners are in their correct positions, you will probably find that some of them are not correctly orientated and need twisting. If you're lucky enough to find that they're all correctly orientated, just move on to the next stage.
In this step our goal is to orient the four corner pieces of the last layer.
The algorithm orients two corners. One corner is in where the F, R and T sides meet, the other one is in where the L, B and T sides meet. These algorithm orients one corner clockwise 120° (that is in closer to us), the second one orients counter-clockwise 120° (that is in further to us). See image!


The following algorithm orients the two (diagonal) corners:
(Ro-Bi-Du - Bo-Ri-Tu)2
(The algorithm in parentheses need to execute twice.)
Suggestion is for the memorization: Robi(n) du(n) bori(ng) too
If you have two well oriented corners or no well oriented corners, then just execute the algorithm once or twice and complete this step.
If you have only one well oriented corner, execute the algorithm until you'll get two oriented corner, then just execute the algorithm one more time or twice to complete this step.
(If you're having difficulty in finding the cw/c-cw direction of a face (like B or D or L), twist temporarily the cube so that face will become the F face which is the easiest face to determine the cw/c-cw direction.)
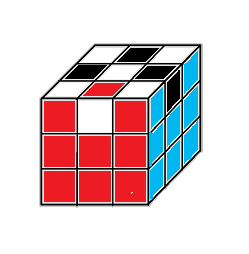
3.3 Permuting edge pieces
We're now at the situation in which we deal with three wrongly positioned edges (black cubies). One edge is in where the R and T sides meet, the other one is in where the B and T sides meet and the third one is in where the L and T sides meet. See image!

The following algorithm rotates the three edges pieces counter-clockwise, and leaves
the fourth edge in place:
Bu-To-Mi-Tu-Mo-Ta-Bu
Suggestion is for the memorization: But omit (s)umo, taboo.
Depending on how the cube is set up, you might have to do this algorithm again.
3.4 Orienting edge pieces
Now that the edges are in their correct positions, you will probably find that some of them (two or four) are not correctly orientated and need to flip.
In our starting position there are four incorrectly orientated edges. Two edges are in where the F & T sides and F & L sides meet, the third one is in where the T and B sides meet, the fourth one is in where the B and D sides meet.
The following, very easy to memorize algorithm orients the four edges:
(Fa-Me)4
(The algorithm in parentheses need to execute four times.)
Suggestion is for the memorization: Fame
If there are only two edges that must be orientated correctly: hold the cube so that one edge flip, the other one remain unchanged and do the algorithm. So get you four incorrectly orientated edges. Turn one or two layer a quarter or half turn and do the algorithm again. Check the cube! Hopefully all edges are correctly orientated.
This was the last step, so will result in the completed cube:

Edited by: Straub Tamás
Watch champions solve Rubik's Cube:
If the champions are not fast enough for you, then look at Magician Steven Brundage: